Digital Photography 101: Low-light photography, part 2
How to shoot light trails and paint with light

In part 2 of our low-light photography series, we'll be talking about how to use long shutter speeds in low-light situations to paint beautiful pictures with light. There's a subtle difference between simply photographing light trails and light painting. Generally, when you're photographing light trails, you're taking a picture of moving lights that you can't control. This could be cars on a highway, airplanes blinking across a night sky, glowing embers rising from a campfire, or even someone riding by on a bicycle with a light.
Light painting

Light painting is a photographic technique in which exposures are made by moving a hand-held light source or by moving the camera. The term light painting also encompasses images lit from outside the frame with hand-held light sources. Light Painting Photography can be traced back to the year 1914 when Frank Gilbreth, along with his wife Lillian Moller Gilbreth, used small lights and the open shutter of a camera to track the motion of manufacturing and clerical workers. Man Ray, in his 1935 series "Space Writing," was the first known art photographer to use the technique.
Techniques
By moving the light source, the light can be used to selectively illuminate parts of the subject or to "paint" a picture by shining it directly into the camera lens. Light painting requires a slow shutter speed, usually a second or more. Light painting can take on the characteristics of a quick pencil sketch. In 1949 Pablo Picasso was visited by Gjon Mili, known photographer and lighting innovator, who introduced him to some of his photographs of ice skaters with lights attached to their skates. Immediately Picasso started making images in the air with a small flashlight in a dark room. This series of photos became known as Picasso's "light drawings." Of these photos, the most celebrated and famous is known as "Picasso draws a centaur in the air."
Shutter speed
Shutter speed can have a dramatic impact on the appearance of moving objects. Changes in background blurring are apparent from the need to adjust the aperture size to achieve proper exposure.


Slow shutter speed combined with panning the camera can achieve a motion blur for moving objects
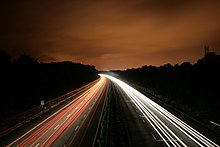
A photo of street at night (exposure time 30 seconds)

A pinwheel photographed at three different shutter speeds
Introduction
In still cameras, the term shutter speed represents the time that the shutter remains open when taking a photograph. Along with the aperture of the lens (also called f-number), it determines the amount of light that reaches the film or sensor. Conventionally, the exposure is measured in units of exposure value (EV), sometimes called stops, representing a halving or doubling of the exposure.Multiple combinations of shutter speed and aperture can give the same exposure: halving the shutter speed doubles the exposure (1 EV more), while doubling the aperture size (halving the focal number) increases the exposure area by a factor of 4 (2 EV). For this reason, standard apertures differ by √2, or about 1.4. Thus an exposure with a shutter speed of 1/250 s and f/8 is the same as with 1/500 s and f/5.6, or 1/125 s and f/11.
In addition to its effect on exposure, the shutter speed changes the way movement appears in the picture. Very short shutter speeds can be used to freeze fast-moving subjects, for example at sporting events. Very long shutter speeds are used to intentionally blur a moving subject for artistic effect. Short exposure times are sometimes called "fast", and long exposure times "slow".
Adjustment to the aperture controls the depth of field, the distance range over which objects are acceptably sharp; such adjustments need to be compensated by changes in the shutter speed.
In early days of photography, available shutter speeds were not standardized, though a typical sequence might have been 1/10 s, 1/25 s, 1/50 s, 1/100 s, 1/200 s and 1/500 s. Following the adoption of a standardized way of representing aperture so that each major step exactly doubled or halved the amount of light entering the camera (f/2.8, f/4, f/5.6, f/8, f/11, f/16, etc.), a standardized 2:1 scale was adopted for shutter speed so that opening one aperture stop and reducing the shutter speed by one step resulted in the identical exposure. The agreed standards for shutter speeds are:
- 1/1000 s
- 1/500 s
- 1/250 s
- 1/125 s
- 1/60 s
- 1/30 s
- 1/15 s
- 1/8 s
- 1/4 s
- 1/2 s
- 1 s

An extended exposure can also allow photographers to catch brief flashes of light, as seen here. Exposure time 15 seconds.
Camera shutters often include one or two other settings for making very long exposures:
- B (for bulb) keeps the shutter open as long as the shutter release is held.
- T (for time) keeps the shutter open until the shutter release is pressed again.
Shutter priority refers to a shooting mode used in semi-automatic cameras. It allows the photographer to choose a shutter speed setting and allow the camera to decide the correct aperture. This is sometimes referred to as Shutter Speed Priority Auto Exposure, or Tv (time value) mode.
Creative utility in photography
Main article: Motion blur

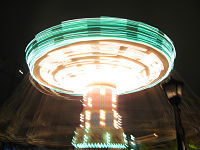
Sparklers moved in a circular motion with an exposure time of 4 seconds. This is an example of Light painting

Images taken with a lower shutter speed invoke a visual sense of movement. Exposure time 3 seconds.
Excessively fast shutter speeds can cause a moving subject to appear unnaturally frozen. For instance, a running person may be caught with both feet in the air with all indication of movement lost in the frozen moment.
When a slower shutter speed is selected, a longer time passes from the moment the shutter opens till the moment it closes. More time is available for movement in the subject to be recorded by the camera.
A slightly slower shutter speed will allow the photographer to introduce an element of blur, either in the subject, where, in our example, the feet, which are the fastest moving element in the frame, might be blurred while the rest remains sharp; or if the camera is panned to follow a moving subject, the background is blurred while the subject remains sharp.
The exact point at which the background or subject will start to blur depends on the rate at which the object is moving, the angle that the object is moving in relation to the camera, the distance it is from the camera and the focal length of the lens in relation to the size of the digital sensor or film.
When slower shutter speeds, in excess of about half a second, are used on running water, the photo will have a ghostly white appearance reminiscent of fog. This effect can be used in landscape photography.
Zoom burst is a technique which entails the variation of the focal length of a zoom lens during a longer exposure. In the moment that the shutter is opened, the lens is zoomed in, changing the focal length during the exposure. The center of the image remains sharp, while the details away from the center form a radial blur, which causes a strong visual effect, forcing the eye into the center of the image.
The following list provides an overview of common photographic uses for standard shutter speeds.
- 1/16000 s: The fastest speed available in APS-H or APS-C format DSLR cameras (as of 2011). (Canon EOS 1D, Nikon D1, D1X, and D1H)
- 1/12000 s: The fastest speed available in any 35 mm film SLR camera. (Minolta Maxxum 9xi, Maxxum 9 (de)
- 1/8000 s: The fastest speed available in production SLR cameras (as of 2011), also the fastest speed available in any full-frame DSLR (as of 2011). Used to take sharp photographs of very fast subjects, such as birds or planes, under good lighting conditions, with a ISO speed of 1,000 or more and a large-aperture lens.
- 1/4000 s: The fastest speed available in consumer SLR cameras as of 2009. Used to take sharp photographs of fast subjects, such as athletes or vehicles, under good lighting conditions and with an ISO setting of up to 800.
- 1/2000 s and 1/1000 s: Used to take sharp photographs of moderately fast subjects under normal lighting conditions.
- 1/500 s and 1/250 s: Used to take sharp photographs of people in motion in everyday situations. 1/250 s is the fastest speed useful for panning; it also allows for a smaller aperture (up to f/11) in motion shots, and hence for a greater depth of field.
- 1/125 s: This speed, and slower ones, are no longer useful for freezing motion. 1/125 s is used to obtain greater depth of field and overall sharpness in landscape photography, and is also often used for panning shots.
- 1/60 s: Used for panning shots, for images taken under dim lighting conditions, and for available light portraits.
- 1/30 s: Used for panning subjects moving slower than 30 miles per hour (48 km/h) and for available-light photography. Images taken at this and slower speeds normally require a tripod or other camera support to be sharp.
- 1/15 s and 1/8 s: This and slower speeds are useful for photographs other than panning shots where motion blur is employed for deliberate effect, or for taking sharp photographs of immobile subjects under bad lighting conditions with a tripod-supported camera.
- 1/4 s, 1/2 s and 1 s: Also mainly used for motion blur effects and/or low-light photography, but only practical with a tripod-supported camera.
- B (bulb) (1 minute to several hours): Used with a mechanically fixed camera in astrophotography and for certain special effects.
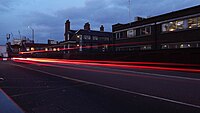 Light streaks outside Waterloo Rail Station in London
 Light streaks on Tottenham Ct. Rd. in London
 Light streaks on Tottenham Ct. Rd. in London of turning Taxi's
 More Light streaks of a bus in London
 Bus moving at high speed
 Slow shutters cannot be handled by hand, a side rail is being used. Bus in London


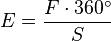
Cinematographic shutter formula
Further information: Rotary disc shutter
Where E = shutter speed (reciprocal of exposure time in seconds), F = frames per second, and S = shutter angle:
 , for E in reciprocal seconds

Electronic video cameras do not have mechanical shutters and allow setting shutter speed directly in time units. Professional video cameras often allow selecting shutter speed in terms of shutter angle instead of time units, especially those that are capable of overcranking or undercranking.
Light painting by moving the camera, also called camera painting, is the antithesis of traditional photography. At night, or in a dark room, the camera can be taken off the tripod and used like a paintbrush. An example is using the night sky as the canvas, the camera as the brush and cityscapes (amongst other light sources) as the palette. Putting energy into moving the camera by stroking lights, making patterns and laying down backgrounds can create abstract artistic images.
Light painting can be done interactively using a webcam. The painted image can already be seen while drawing by using a monitor or projector.
A technique known from light art is to project images on to irregular surfaces (faces, bodies, buildings etc.), in effect "painting" them with light. A photograph or other fixed portrayal of the resulting image is then made.
Equipment

Orb created by swinging a light source, domes created by spinning a wheel with light source attached
A variety of light sources can be used, ranging from simple flashlights to dedicated devices like the Hosemaster, which uses a fiber optic light pen. Other sources of light including candles, matches, fireworks, lighter flints, glowsticks, and Poi are also popular.
A tripod is usually necessary due to the long exposure times involved. Alternatively, the camera may be placed on or braced against a table or other solid support. A shutter release cable or self timer is generally employed in order to minimize camera shake. Color Gels can also be used to color the light sources.
Gallery

Portrait illuminated by light painting with a sparkler

Star image produced with light painting

Long exposure photo of a light show dance using finger lights.

Waiting for better times

Light painting with steel wool

Urban Light Painting by Lichtfaktor
Light painting, on the other hand, refers to creating pictures using either a hand-held light source like a flashlight, sparkler, or LED light, or actually moving the camera itself to create the patterns of light. Subgenres such as portraiture use light to create words or pictures, and videos use light painting to
create animation. With practice, you can create some truly stunning images. What you need
You don't need any specialized equipment to photograph light trails or light painting — all you need is a digital camera on which you can control the shutter speed. A tripod is definitely a good idea as well, though you can usually find somewhere to prop your camera so that it doesn't move. Since you're going to have the shutter open for much longer than a human being could hold a camera steady, you need to have some way to keep it still and aimed in the right direction.
Also be aware that moving traffic will cause the ground to shake, especially if you're on a bridge or something similarly raised. You'll probably have the best luck setting up at a distance from the place you're photographing. Or try putting a blanket under your tripod to absorb the motion.
As with all photography, you'll probably get better results with a better camera, but it is possible to shoot light trails with a point-and-shoot. Look for a camera that does well in low-light situations, with a large sensor and a good lens. It's also helpful to have a lens hood to block ambient light and a cable release or remote control for your camera.
Start simple with light trails
The simplest introduction to this type of photography is to start with light trails. Just find a location where you have a good view of a stretch of roadway, set up your camera (somewhere safe, of course!), and start playing with exposure settings. Try keeping the shutter open for 1 second, 2 seconds, even a minute or more, and see what happens. Depending on how much ambient light you have, you might want to go up to 20 seconds or more.

This way, you can get a feel for how long you need to keep the shutter open while also learning how to watch the way the movement of the cars turns into streams of light. You can't control where the cars go (presumably), but you can control how you frame the picture to make it the most aesthetically pleasing.
Get out the (light) paintbrush
Now you're ready to try some painting! First, find somewhere nice and dark to take your pictures. A dark interior room will work, but you can also try various places outside — just be careful to avoid hazards on the ground, especially if you're going to be the one both taking the pictures and doing the painting. Be aware of any other potential light sources in your picture, keeping in mind that with a very long exposure, even dim, far-away streetlights will seem bright.
Next, you'll need a light source. This can be just about anything from a flashlight to a laser pointer to the lit-up screen on your phone. There are a lot of smartphone apps that turn your phone's screen into a solid white "flashlight," and many of them even let you choose different colors.
 Take a couple of shots with lights on or using the flash, so that you're sure you've set your focus and framing correctly. Remember, you'll have to move around in the dark to get things set up for your real picture, so be sure you make note of where your frame starts and ends, and where your depth of field will keep your painting in focus.
Once you're all set up, start shooting! If you want to be the one doing the painting, set your camera's self-timer so you have a few seconds to get into the frame. Wait till the shutter opens, then start waving your light source around. Experiment! Don't forget, if you're going to try to "write" something, you'll have to do it backwards if you're facing the camera. Also, the longer you hold your light source in one place, the brighter that spot will appear. You can also use your light source as a "flash" to illuminate parts of your image at separate times, which can create a spooky, ghost-like effect.

Experiment, experiment, experiment
The "experiment" refrain is probably getting old by now, but light painting is definitely a realm that requires a great deal of practice and experimentation. Be creative! With so many different lighting effects you can achieve, you're really limited only by your imagination and your willingness to try new things.
thanks to

No comments:
Post a Comment
Note: Only a member of this blog may post a comment.